Saturday, June 11, 2016

Home Tour: Kitchen Update

Hey y'all! I guess I should probably just quit starting every post with an apology for the lack of consistent posting because at this point you're probably all like OKAY WE GET IT YOU CAN'T KEEP UP WITH IT STOP APOLOGZING. It's true. I can't. HOWEVER, I have had good reason for it and I'm here to tell you what that reason was. The kitchen. More specifically, the kitchen update! The kitchen was something that I both loved and hated about our house when we chose it. 

Things I loved:
  • The size. It's huge. 
  • The flooring. Wide plank hardwoods are life. I wish ours were darker but I will TAKE IT!
  • The window above the sink. Something I always wanted!
  • The bay window in the breakfast nook. I mean...natural light is always the goal!
  • The number of cabinets. We have cabinet space galore!
Things I hated:
  • The yellowed 80's countertops. Our countertops were original to the house. The house is 2 years older than me. You do the math. (Reference last post for my current age).
  • The refrigerator. Same issue. It had been replaced in the early 90's however...it was still very yellowed and icky and when it's that big of an appliance...it sticks out like a sore thumb!
  • The color of our many wonderful cabinets. I am still not a fan of the reddish wood cabinets however, the new changes have helped soften them a lot! (More on that in a second!)
  • The lack of a backsplash. Although I would come to love that it did not have one because THAT made it much easier to put one in ourselves!
  • The sink and faucet. The sink was stainless which normally I love...HOWEVER, it was very shallow and very worn. The faucet had all kinds of issues and I realized while gathering my pictures for this post that I do not have a picture of the of it. Boo. 
OKAY! Now that we've gotten that out of the way, let me tell you a little something about what the hubs and I have been doing for the last several months. Here's the thing: updates aren't cheap. In order to make them more affordable, we have had to do a LOT of saving and a LOT of waiting. The key is to do it in steps. Our first step in updating our kitchen was a fresh coat of paint. This poor room has gone from it's original green walls (previous owners) to a dark blue (me) and then once I decided that made it look too much like a CAVE...it's current very light gray. 

Next step and without a doubt the MESSIEST step: Backsplash. Remember how I said I hated that there was no backsplash? Well that is true. HOWEVER, the utter lack of a backsplash did make it much, much easier to install one because we did not have an old surely outdated one to remove beforehand. Just ask my parents...removing an old tile backsplash is not something you ever really want to have to do in your life. Of course since I'm me and I wish I was Joanna Gaines, I went with a white subway tile pattern and dark, dark grout. I'm not sure why. I love white. White is my best friend when it comes to any decor decisions. However, I don't love trying to keep white grout clean, so I went in the opposite direction for once. This project took a couple days and a LOT of help from my precious Dad who had JUST finished doing his own backsplash project at their home. (By the way you should see my parent's kitchen it is UNBELIEVABLY beautiful. My mom is the reason I love to design and decorate. She is the true master.) Anyways, it was hard and messy and sticky and I was pretty sure I would NEVER be able to get all of the grout out of my kitchen and out from under my fingernails but...both happened. Yay! So, we finally had a backsplash and I was thrilled. This project was actually unbelievably cheap. We spent roughly $100 on the whole thing. That's what I'm talking about! The materials all came from home depot and the labor came from us. Here is the first picture I took of it when it was all finished and cleaned!
I love it more everyday! That was the first step I took towards bringing more white into my yellowed 80's kitchen. It was cheap but it was hard work. The next step...a new fridge. I don't have any pictures specifcally of the old one but like I said...early 90's...defective ice maker...yellow-tinted...grossness. The hubs actually wanted to replace it even more than I did. The water dispenser on the old one had all sorts of problems and he got tired of dealing with it. Throw in the lack of an ice maker and it was enough to make him want to throw it out on the street and leave it there. Weirdly enough, we actually looked for a new one for quite awhile. I wanted stainless and one with a freezer drawer. He wanted one with a chilled in-door water dispenser...so we compromised. (Because the ones with both of those features were just too out of our price range.) We ended up with this beaut. It is an LG stainless (yay me!) side by side with chilled water and ice dispenser just like M wanted. I love it. It has already made our lives easier and instantly updated the kitchen without even trying. It's just so big. In order for our kitchen to ever come out of it's 90's grunge phase...we had to get that other one out the door and fast!


Next on the list was the biggest...countertops, sink, and faucet! Woo! I have wanted white marble countertops for awhile now so obviously, they were first on my list. HOWEVER, white marble countertops are EXPENSIVE. Like, real expensive. So, we went with our closest alternative. Our new countertops are...drumroll please...laminate! Yes! Your eyes may decieve you (and I hope that they do). These babies are my special marble knock-offs and I love them to pieces. I chose a pattern from Lowes called Calacatta Marble and I opted for a glossy finish and squared off edges to try my best to make them look as much like the real thing as possible. I mean let's be real...anything would have looked better than our old ones. Fun fact: when we removed the old ones (yes we did all the work ourselves with the help of my AWESOME father-in-law...much, much cheaper that way!) we saw that the name of our neighborhood was printed on the bottoms of all of them. Re-confirming that they were in fact original to our 27 year old (oops! I said it) house. Another HUGE choice we made when ordering the new countertops was to add an island. Some of you may know or remember that I originally had an old farm table in the kitchen as my island of sorts. I loved it so very much but quickly realized that it was not serving the purpose that I really needed to be served by a kitchen island...so I sold it to a sweet friend of mine who is using it in her new PRECIOUS home. I was SO glad to find someone who would love it as much as I did! The next choice was the sink. I'm sure it will come as no shock to any of you that my dream sink was a white farm sink. However those things are PRICEY and I mean PRICEY. So once again, I opted for a cheaper yet still gorgeous alternative. I chose a 9 inch deep, double bowl, cast-iron sink from lowes and I love it with all my heart. It is about 2 inches deeper than our previous sink which makes way more of a difference than you might would think. It is white and bright and just adds so much to the space. The new faucet was one that i would not budge on. At first, the hubs was wary...but now I am pretty positive he loves it even more than I do. Everytime we see one like it on any given design show he's like HEY! They have our faucet! And I'm like yeah! That's why I wanted it! Anyways...maybe now I will stop talking about all of this and actually show you what our kitchen looked like...then and now.

Here it is when we bought it:


Here it is when we first started to make some changes:
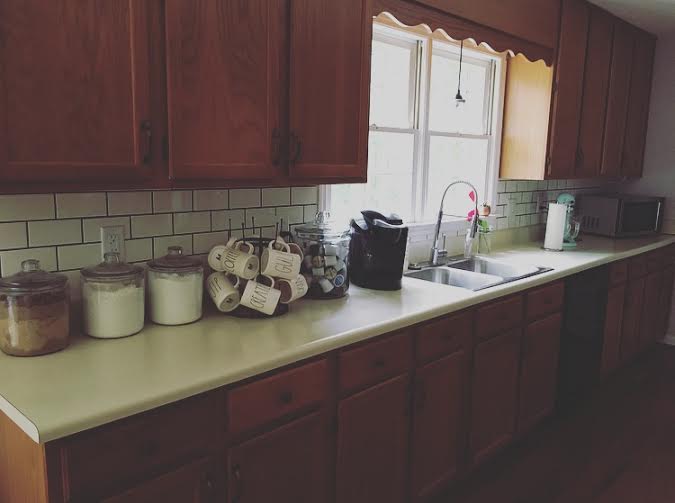


and here it is now!


Here are a couple more specific before and after shots:


I would still love to one day update the other appliances and maybe even paint those reddish-brown wood cabinets, but for now, I think I'll just grab my new favorite Princess Diaries inspired mug (real fans will get it!) given to me for my birthday by one of my besties, sit back, relax, and enjoy my light and bright kitchen.


Cheers y'all and happy weekend!

Friday, May 27, 2016

'Merica & Me


Hello! You are now reading the blog of a 25 year old. Yes, I turned 25 yesterday and I am still not quite sure how I feel about it. Nevertheless, my husband, family, and friends showered me with love and fun and made it into one of the best birthdays ever! (Big shout out to Josh and Audrey for passing the huge balloons down to me after Audrey's 25th birthday bash last weekend!) I spent the day at the lake with my family yesterday and the weather could not have been more perfect. Got some sun, cruised around on the boat, listened to some music, and watched my Dad, Husband, and Brother wipe out on the knee board. Couldn't ask for more! My amazing Mama made me a delicious homemade cookie cake (seriously, hers are better than Great American Cookie I kid you not) and for dinner, we had my favorite...chinese takeout! I know, so fancy. I know I am usually the one that does the decorating around here but I just HAVE to brag on my adorable hubs really quick because look what I came home to after dinner with my friends on Wednesday night:


I mean...does it get any cuter? He would like me to point out that he did not make the rainbow fabric garland...that was me. However, he did get it out and put it up so I still give him all the credit for the cuteness! Of course the giant balloons were front and center and the window in the front was filled with all of my instagram pictures from the last year (wow...I take a lot. *ahem*). Is that precious or what? Lastly, the cherry on top (literally) was the giant wrapping tissue ice cream sundae you see in the far right corner. My sweet hubby got me an awesome, beautiful, Cuisinart ice cream maker for my birthday (per my specific request) and wrapped it in the most creative way possible. To be completely honest, I think he is more excited about that gift than I am...he's begging me to make him frozen yogurt this weekend which of course I will attempt to do. If it works, I may even post it on here! Hmm. Anyways! It was a fabulous day and I could not be more thankful for the people in my life. I am blessed.

Switching gears a little bit:

Now that the birthday fun has settled down a bit, I decided to go ahead and "decorate" if you can really even call it that, for Memorial Day. This is certainly not a holiday I go all out for but of course it is a holiday, so I decorate a little. (I'm ridiculous that way.) 

Side note: I am actually planning to post some more holiday pictures soon here. Yes I am aware that it's May and nobody is even thinking about pumpkins or stockings right now, BUT I would really like to start a section based on what I did last year so that I will be able to add to it this year!

Okay, back to Memorial Day.


Remember how I have that wreath and window obsession and that other obsession with holidays and that other other obsession with switching out my wreaths on my windows for all the different holidays? WELL, here we go. My mama actually made me this adorable burlap American flag wreath last year and I love it oh so much. 

For my gigantic window, I hung my Dad's old tattered and faded American Flag that we used to have flying in front of the house (until it ripped!) My Dad is actually a retired Navy pilot so shout out to him and all the other brave men and women who have bravely fought for our country.  


I got these adorable American Flag pillows for my birthday last year! They came from Target (duh) and I absolutely love them in the summer!


Last but not least is the mantle. I really did not do much at all besides add some mini American flags to my anthro bunny (which I am just having the hardest time putting away ever since...Easter?) I think it's probably just going to become part of my regular decor. Why not?


So that is it! It's not much but I think it's pretty clear where I pledge my allegiance. Thanks for reading and have a fabulous Memorial Day Weekend!

Wednesday, May 18, 2016

Home Tour: Guest Room

Hello! Long time no see! I apologize once again for the huge gap between posts...these last couple weeks of the school year have been insanely packed and I swear I've sat down approximately one time. Anywho, I am now off for the summer (woot woot!) and am planning to really get going with this blogging thing. Today, I am continuing the home tour with a tour of our guest room. I have to admit...this room has probably changed more than any other room (maybe with the exception of the den). However, this is it in its current spring/summer state. Granted, we do not have a ton of guests because we are blessed enough to have most of our friends and family close by. However, my goal is that when we do have the occasional guest, they feel comfortable and at home while they stay with us. 


Here lies (hangs?) the only wreath in our whole house that is not accompanied by a window. *Insert Gasp* Unfortunately, the previous owners installed a massive shelf in both bedrooms and the hubs and I have been too lazy to take them down because we don't want to patch all those massive holes it will undoubtedly leave behind. Eventually we will get around to it...eventually. That being said, I ultimately made the decision that I could not fit a large enough window in that space without it looking too close to the shelf, so I went with a solo wreath. The wreath (like all the other boxwoods in the house) is from Target and the lamp on this table is actually a DIY project that the hubs and I did together before we got married. All you need is a gallon size mason jar (can be found at Hobby Lobby), a lamp shade of your choice (I went with burlap because...mason jar), and a light kit. Obviously, I let him take care of the electrical part of this project because he is an electrical engineer after all. What good is that degree if he can't wire up some lamps for me every once in a while? (JK, love you, M) ANYWAYS, moving on. The table was actually a vintage find at a local flea market that I fell in love with and knew I had to have. It is painted a gorgeous sky blue with antique detail work and handles on the drawers. Be still my heart. The botanical prints were a free download from one of my favorite blogs a few months ago and the frames were a gift from my wonderful Mother-in-law. The blanket ladder was yet another DIY project. Husband built and wife painted. We used all discounted wood from Home Depot (seriously, always check the 70% off bin...you can easily find some great stuff and end up paying next to nothing for a whole project like this). I painted the entire thing a flat black and then went over it with white chalk paint that I actually purchased at the same flea market as I purchased the table. After the white coat was dry, I gently distressed the whole thing with some fine grit sand paper and that was it! Such a cheap, easy piece of furniture! 


The "Snuggle is Real" sign featured above was actually an etsy instant download print that I purchased for $1.50, printed onto a piece of white cardstock, and then hung in a frame that I already had sitting in the craft closet (originally from Hobby Lobby). I thought it was the perfect addition to this cozy corner...and let's face it, with those blankets hanging there...the snuggle IS real.

Next up is probably the star of the show, the bed. I purchased this vintage brass headboard from that SAME flea market as the sofa table and the chalk paint. These were all on different days but seriously...that place is the best. This beauty was $30 and it gave the bed the exact feel I was going for. The bed is a full bed that was actually mine growing up. Thanks for letting me keep it, Mom and Dad! The bedding is an old down comforter (also from childhood) and then a botanicals themed duvet from ikea! I absolutely love ikea's duvet covers and have another one on the bed in our master bedroom (but that's a different post). 


The bird and egg print AND the giant Pottery Barn (yes...Pottery Barn) sweater pillow were both...if you can believe it or not...drumroll please...YARD SALE FINDS! I paid $5 for the pillow and the bird print was just given to me for free! You cannot beat free. Ever. Yard sales rule. The hanging pendant light is one of the more modern things in the house (my cousin Davis would be so proud...more on him in a little bit) and it actually came from Target. It was $30 and came with the edison bulb (my fave) which is actually a really great deal considering those bulbs alone usually run for about $10. I have recently become a big fan of pendant lights over night stands rather than the traditional table lamp and am currently working on a similar project in our bedroom. But, that too is for another post.


The round frame was actually used at our wedding and was another gift from my awesome MIL. This sweet little bunny was from Target's Easter decor a couple years ago and I could not help but leave him out for the spring. The "Be Our Guest" print is another instant download from etsy which I printed and framed the same way as before. The Fairhaven Dry Goods Tray was from Target several years ago (like while we were registering for wedding gifts) and my Mama bought it for me because she was afraid that by the time I had my wedding showers...it would be gone. She was right! I love it so much and think it fits perfectly in this room.

So there you have it! Another room down. Before I go, there's something else that I am super excited about. My cousin, Davis (remember the one I mentioned a little bit ago?) just graduated with a degree in design and is now headed to Austin, Texas this fall to study architecture. Why am I telling you all this? WELL. Davis has decided that instead of paying to live in an expensive Austin apartment, he is going to spend this summer (with the help of my awesome Hubs and a couple other friends) building his own TINY HOUSE to live in for the next few years while he's in grad school! A TINY HOUSE! Tiny Houses have intrigued me (and I think most of us, let's be real) for awhile now and he has agreed to allow me to blog about the progress. Don't worry, this is not going to become a tiny house blog, BUT I do plan on featuring it a few times as the summer goes on because...how awesome is that? For more detailed news about the project (aka for posts that aren't just going to be "LOOK HOW CUTE!" or "EVERYTHING'S SO LITTLE AND ADORABLE!" *ahem*) you can head on over to Davis' website here and see everything up close. I have also added a link to his site on my side bar for easier access. 

Thanks again for reading, lovelies! Happy Hump Day!