Showing posts with label Home Tour. Show all posts

Friday, August 19, 2016

Not so Extreme Laundry Closet Makeover

Hi friends! Just wanted to pop in and tell y'all about a little (very little) project the hubs and I completed over the course of this week. I may or may not have complained on here before about how ugly my laundry closet is. Yes, I did say laundry closet and not laundry room. This is because A) My sister-in-law corrects me every time I mistakenly call it a room and B) Well because it is by all standards...a closet. All there's room for is the washer and dryer and that is pretty much it. Who needs extra storage am I right? (Said no one ever). *Ahem* anyways, closet or not...that thing was U-G-L-Y. It was a tiny space that was overlooked and forgotten about when we were making our way through painting the house. I mean why bother, right? Who loves doing laundry? Not this girl. This closet is actually off of our breakfast nook in the kitchen and has bifold (not actually sure if that is the correct term or not) doors that conceal its ugliness. So, for the last 2 years I have just kept those doors closed and ignored it by all means necessary (not hard to do because...laundry). SO, as you can probably definitely guess based on the title of this already ridiculously long post...I finally decided that enough was enough! It was time to give that bad boy a makeover. First step, removing the old ugly yellowed utility shelf and patching all the lovely holes it left behind.


That whole process took about 20 minutes or so. (Enter husband with the power tools). Next, that lovely two tone nothingness had to go. Pro's of having a laundry closet? SUPER quick and easy to paint because it's a closet for goodness sake! So, I grabbed some left over oops paint from Home Depot that we had from another project and went to town. Side note: If you are unfamiliar with the term "oops paint" you should definitely become familiar with it. Oops paint (at least that is what they call it at Home Depot) is any gallon of paint that they mix for a customer that they do not end up liking and therefore put it on a discount shelf by the counter and mark it down to $9 for the whole gallon! You cannot beat that. We were lucky enough to find a lovely gray one day and have now used our $9 treasure for two projects. We still have lots left too! The next step was the light. The current light is one of a...dare I say it...fluorescent nature. Yuck, nothing I hate more! Luckily though, the gross thing is hidden up on the front wall where you cannot see it unless you are standing behind the washer and dryer. If you are the kind of weirdo who chooses to spend your time standing back there, then I have nothing to say. You will see my ugly fluorescent light. HOWEVER, thank goodness my awesome husband is an electrical engineer that can do things like wire a new outlet up there for me and hang a much more attractive/cottage friendly piece that his crazy wife found at a yard sale awhile back. Enter, my kiddie chandelier. Yes I know it was probably meant to hang in a little girl's adorable bedroom but I think it works PERFECTLY in this space. Of course since he is so awesome, he even wired it to where I can turn it off and on with the switch that once worked the ugly fluorescent thing. Last step: the shelf. I would love to sit here and tell you that I DIY'ed an awesome wood shelf but I didn't. My lazy self went to Lowes, picked out a $10 floating shelf, and called it done. The only other thing we did which is probably not noticeable to anyone but us was change out the old yellowed outlet and cover for new crisp, clean white ones. Since the thing just HAS to show above the dryer. 


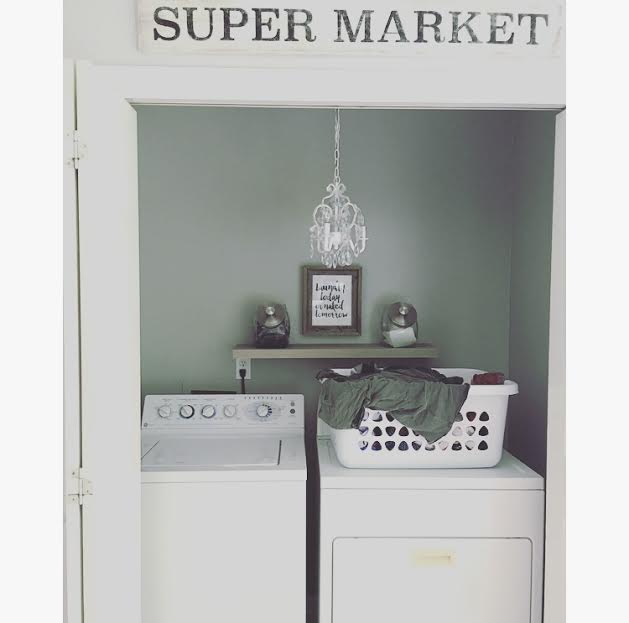
All that to say, we now have a...drumroll, please...NOT SO UGLY LAUNDRY CLOSET! Yes I still hate laundry and no that will never change, but I now actually like to leave those doors open and show off my washer and dryer to the world. It is no longer my Monica closet (Friends fans where you at?!) and I am no longer ashamed. Of course my sign was re-hung because it is my one and only motivation to do laundry. I will leave you with it: Laundry Today or Naked Tomorrow.

Happy Friday you guys and cheers to the weekend!

Thursday, August 4, 2016

More Shiplappin'

Hello! Remember when I said summer would be the perfect time for me to blog more? LOL! School starts back in a week and this is my second post for the whole break. So much for that! Needless to say, it has been a busy season and luckily the hubs and I were able to squeeze in one more (cheap) DIY project before it gets even busier! It's no secret that I love shiplap. If I could shiplap my whole house, I would do it in a heartbeat. However, it took us 4 days and a lot of headache to get just one wall done, so that will certainly not be happening. 

SO, most of you know that I had "shiplapped" my mantle awhile ago and settled on painting the rest of the wall white in lieu of continuing with it. 


Well long story short, I decided that wasn't enough. I approached my hubs with the idea this past weekend. I proposed we use the exact same materials as we did for the mantle (a cheaper shiplap alternative) but simply, multiplied. If you didn't catch it in my original shiplapping tutorial, here is what we used instead of actual shiplap or the other popular alternative, tongue and groove boards:
  • Six 8x4' Sheets of 1/4 inch Plywood Underlayment (We had to have ours cut down into Twelve 8x2' sheets in order to fit them in the back of my car and transport them home!)
They look like this:


(Peep my donut float making a cameo in the bottom right corner.) 

We got ours at Home Depot for about $12 a piece.
  • White Paint
We put a couple coats of Behr Premium Plus Ultra (Say that 5 times fast) Ultra white paint (with nothing mixed in) on the boards. It took about a gallon and a half to finish this project. Please ignore the awkward arm positioning...I have no idea what I was doing at the time.

  • Table Saw
Next, the most noisy and time consuming part of this process, cutting the boards. We cut ours into 6 inch wide strips. We left them all at 8 feet long so that we could use some and cut some down later when we knew more exact measurements. Ignore how hideously ugly our garage is...it was raining so we had to move everything indoors.


After we cut the strips, I applied a third and final coat of paint to them (the table saw was a little harsh on some) and we were FINALLY ready to start putting these bad boys on the wall.

This...as you can imagine...was a SLOW process. First, we actually had to remove the existing shiplap so that they would not make the rest of the wall look wonky. Wonky is a term my sister and her friends use all the time and now she has me saying it. I do feel as though it is a great description for this particular instance however. Anywho, we actually had a little laugh after removing the boards because both of us had forgotten that we put them up before re-painting the rest of the wall.

  • Hammer, Finishing Nails, A whole lot of patience
Next, the actual assembly. Yay! We had every intention of making a time-lapse video of the whole process but then promptly forgot. Oh well. We used tiny finishing nails to attach the boards to the wall and nickels (sorry cashier at target for requesting $2 in nickels as part of my cash back...it was all for the cause!) to space them out. Who needs actual spacers when you have loose change that you can spend again later...am I right? I apologize in advance for the HORRIBLE lighting. All of this work was basically done at night.


Slowly but surely, board by board, it all came together. One rookie mistake we made that I will warn you about now...we used galvanized finishing nails. Never use galvanized nails when you're working with and handling white wood. By the time we were finished, there were almost more black fingerprints and smudges than there was white paint. Luckily, magic eraser came to the rescue and cleaned it all up for me. I had originally planned to go back with a paintbrush and cover up the little nails, however the more I looked at them showing in all their glory, the more I loved them. I feel like it looks more authentic with them showing and I am all about that! 

Here are some before and afters of the finished product:


It was a lot of work, but oh so worth it! I apologize again for my utter lack of blogging this summer but I promise before you know it, I'll be back at it with all of my favorite fall decor! Thanks for reading and happy friday eve!


Saturday, June 11, 2016

Home Tour: Kitchen Update

Hey y'all! I guess I should probably just quit starting every post with an apology for the lack of consistent posting because at this point you're probably all like OKAY WE GET IT YOU CAN'T KEEP UP WITH IT STOP APOLOGZING. It's true. I can't. HOWEVER, I have had good reason for it and I'm here to tell you what that reason was. The kitchen. More specifically, the kitchen update! The kitchen was something that I both loved and hated about our house when we chose it. 

Things I loved:
  • The size. It's huge. 
  • The flooring. Wide plank hardwoods are life. I wish ours were darker but I will TAKE IT!
  • The window above the sink. Something I always wanted!
  • The bay window in the breakfast nook. I mean...natural light is always the goal!
  • The number of cabinets. We have cabinet space galore!
Things I hated:
  • The yellowed 80's countertops. Our countertops were original to the house. The house is 2 years older than me. You do the math. (Reference last post for my current age).
  • The refrigerator. Same issue. It had been replaced in the early 90's however...it was still very yellowed and icky and when it's that big of an appliance...it sticks out like a sore thumb!
  • The color of our many wonderful cabinets. I am still not a fan of the reddish wood cabinets however, the new changes have helped soften them a lot! (More on that in a second!)
  • The lack of a backsplash. Although I would come to love that it did not have one because THAT made it much easier to put one in ourselves!
  • The sink and faucet. The sink was stainless which normally I love...HOWEVER, it was very shallow and very worn. The faucet had all kinds of issues and I realized while gathering my pictures for this post that I do not have a picture of the of it. Boo. 
OKAY! Now that we've gotten that out of the way, let me tell you a little something about what the hubs and I have been doing for the last several months. Here's the thing: updates aren't cheap. In order to make them more affordable, we have had to do a LOT of saving and a LOT of waiting. The key is to do it in steps. Our first step in updating our kitchen was a fresh coat of paint. This poor room has gone from it's original green walls (previous owners) to a dark blue (me) and then once I decided that made it look too much like a CAVE...it's current very light gray. 

Next step and without a doubt the MESSIEST step: Backsplash. Remember how I said I hated that there was no backsplash? Well that is true. HOWEVER, the utter lack of a backsplash did make it much, much easier to install one because we did not have an old surely outdated one to remove beforehand. Just ask my parents...removing an old tile backsplash is not something you ever really want to have to do in your life. Of course since I'm me and I wish I was Joanna Gaines, I went with a white subway tile pattern and dark, dark grout. I'm not sure why. I love white. White is my best friend when it comes to any decor decisions. However, I don't love trying to keep white grout clean, so I went in the opposite direction for once. This project took a couple days and a LOT of help from my precious Dad who had JUST finished doing his own backsplash project at their home. (By the way you should see my parent's kitchen it is UNBELIEVABLY beautiful. My mom is the reason I love to design and decorate. She is the true master.) Anyways, it was hard and messy and sticky and I was pretty sure I would NEVER be able to get all of the grout out of my kitchen and out from under my fingernails but...both happened. Yay! So, we finally had a backsplash and I was thrilled. This project was actually unbelievably cheap. We spent roughly $100 on the whole thing. That's what I'm talking about! The materials all came from home depot and the labor came from us. Here is the first picture I took of it when it was all finished and cleaned!
I love it more everyday! That was the first step I took towards bringing more white into my yellowed 80's kitchen. It was cheap but it was hard work. The next step...a new fridge. I don't have any pictures specifcally of the old one but like I said...early 90's...defective ice maker...yellow-tinted...grossness. The hubs actually wanted to replace it even more than I did. The water dispenser on the old one had all sorts of problems and he got tired of dealing with it. Throw in the lack of an ice maker and it was enough to make him want to throw it out on the street and leave it there. Weirdly enough, we actually looked for a new one for quite awhile. I wanted stainless and one with a freezer drawer. He wanted one with a chilled in-door water dispenser...so we compromised. (Because the ones with both of those features were just too out of our price range.) We ended up with this beaut. It is an LG stainless (yay me!) side by side with chilled water and ice dispenser just like M wanted. I love it. It has already made our lives easier and instantly updated the kitchen without even trying. It's just so big. In order for our kitchen to ever come out of it's 90's grunge phase...we had to get that other one out the door and fast!


Next on the list was the biggest...countertops, sink, and faucet! Woo! I have wanted white marble countertops for awhile now so obviously, they were first on my list. HOWEVER, white marble countertops are EXPENSIVE. Like, real expensive. So, we went with our closest alternative. Our new countertops are...drumroll please...laminate! Yes! Your eyes may decieve you (and I hope that they do). These babies are my special marble knock-offs and I love them to pieces. I chose a pattern from Lowes called Calacatta Marble and I opted for a glossy finish and squared off edges to try my best to make them look as much like the real thing as possible. I mean let's be real...anything would have looked better than our old ones. Fun fact: when we removed the old ones (yes we did all the work ourselves with the help of my AWESOME father-in-law...much, much cheaper that way!) we saw that the name of our neighborhood was printed on the bottoms of all of them. Re-confirming that they were in fact original to our 27 year old (oops! I said it) house. Another HUGE choice we made when ordering the new countertops was to add an island. Some of you may know or remember that I originally had an old farm table in the kitchen as my island of sorts. I loved it so very much but quickly realized that it was not serving the purpose that I really needed to be served by a kitchen island...so I sold it to a sweet friend of mine who is using it in her new PRECIOUS home. I was SO glad to find someone who would love it as much as I did! The next choice was the sink. I'm sure it will come as no shock to any of you that my dream sink was a white farm sink. However those things are PRICEY and I mean PRICEY. So once again, I opted for a cheaper yet still gorgeous alternative. I chose a 9 inch deep, double bowl, cast-iron sink from lowes and I love it with all my heart. It is about 2 inches deeper than our previous sink which makes way more of a difference than you might would think. It is white and bright and just adds so much to the space. The new faucet was one that i would not budge on. At first, the hubs was wary...but now I am pretty positive he loves it even more than I do. Everytime we see one like it on any given design show he's like HEY! They have our faucet! And I'm like yeah! That's why I wanted it! Anyways...maybe now I will stop talking about all of this and actually show you what our kitchen looked like...then and now.

Here it is when we bought it:


Here it is when we first started to make some changes:


and here it is now!


Here are a couple more specific before and after shots:


I would still love to one day update the other appliances and maybe even paint those reddish-brown wood cabinets, but for now, I think I'll just grab my new favorite Princess Diaries inspired mug (real fans will get it!) given to me for my birthday by one of my besties, sit back, relax, and enjoy my light and bright kitchen.


Cheers y'all and happy weekend!