Showing posts with label Den. Show all posts

Thursday, August 4, 2016

More Shiplappin'

Hello! Remember when I said summer would be the perfect time for me to blog more? LOL! School starts back in a week and this is my second post for the whole break. So much for that! Needless to say, it has been a busy season and luckily the hubs and I were able to squeeze in one more (cheap) DIY project before it gets even busier! It's no secret that I love shiplap. If I could shiplap my whole house, I would do it in a heartbeat. However, it took us 4 days and a lot of headache to get just one wall done, so that will certainly not be happening. 

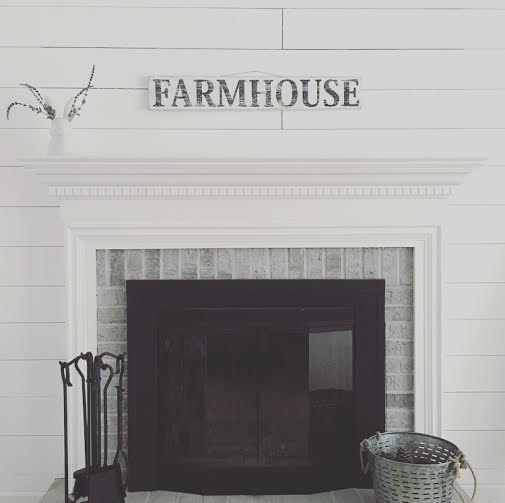
SO, most of you know that I had "shiplapped" my mantle awhile ago and settled on painting the rest of the wall white in lieu of continuing with it. 


Well long story short, I decided that wasn't enough. I approached my hubs with the idea this past weekend. I proposed we use the exact same materials as we did for the mantle (a cheaper shiplap alternative) but simply, multiplied. If you didn't catch it in my original shiplapping tutorial, here is what we used instead of actual shiplap or the other popular alternative, tongue and groove boards:
  • Six 8x4' Sheets of 1/4 inch Plywood Underlayment (We had to have ours cut down into Twelve 8x2' sheets in order to fit them in the back of my car and transport them home!)
They look like this:


(Peep my donut float making a cameo in the bottom right corner.) 

We got ours at Home Depot for about $12 a piece.
  • White Paint
We put a couple coats of Behr Premium Plus Ultra (Say that 5 times fast) Ultra white paint (with nothing mixed in) on the boards. It took about a gallon and a half to finish this project. Please ignore the awkward arm positioning...I have no idea what I was doing at the time.

  • Table Saw
Next, the most noisy and time consuming part of this process, cutting the boards. We cut ours into 6 inch wide strips. We left them all at 8 feet long so that we could use some and cut some down later when we knew more exact measurements. Ignore how hideously ugly our garage is...it was raining so we had to move everything indoors.


After we cut the strips, I applied a third and final coat of paint to them (the table saw was a little harsh on some) and we were FINALLY ready to start putting these bad boys on the wall.

This...as you can imagine...was a SLOW process. First, we actually had to remove the existing shiplap so that they would not make the rest of the wall look wonky. Wonky is a term my sister and her friends use all the time and now she has me saying it. I do feel as though it is a great description for this particular instance however. Anywho, we actually had a little laugh after removing the boards because both of us had forgotten that we put them up before re-painting the rest of the wall.

  • Hammer, Finishing Nails, A whole lot of patience
Next, the actual assembly. Yay! We had every intention of making a time-lapse video of the whole process but then promptly forgot. Oh well. We used tiny finishing nails to attach the boards to the wall and nickels (sorry cashier at target for requesting $2 in nickels as part of my cash back...it was all for the cause!) to space them out. Who needs actual spacers when you have loose change that you can spend again later...am I right? I apologize in advance for the HORRIBLE lighting. All of this work was basically done at night.


Slowly but surely, board by board, it all came together. One rookie mistake we made that I will warn you about now...we used galvanized finishing nails. Never use galvanized nails when you're working with and handling white wood. By the time we were finished, there were almost more black fingerprints and smudges than there was white paint. Luckily, magic eraser came to the rescue and cleaned it all up for me. I had originally planned to go back with a paintbrush and cover up the little nails, however the more I looked at them showing in all their glory, the more I loved them. I feel like it looks more authentic with them showing and I am all about that! 

Here are some before and afters of the finished product:


It was a lot of work, but oh so worth it! I apologize again for my utter lack of blogging this summer but I promise before you know it, I'll be back at it with all of my favorite fall decor! Thanks for reading and happy friday eve!


Monday, April 18, 2016

Home Tour: Den

Okay so, this is not a full home tour by any means because let's face it, not every single aspect is blog worthy! However, these are a few of my favorite spots in the house. I thought I would show you these as sort of an introduction to my overall style. 

First stop is the den. This room has changed A LOT in the past 2 years. Probably more than any other in the house. I can't help myself. I spend most of my time in here. This is where the hubs and I watch netflix, entertain, and truth be told...eat our dinners!


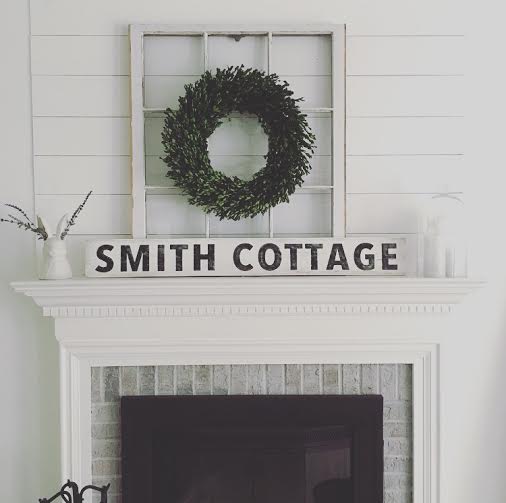
Our mantle changes with the season, as you'll see in some posts to come! This is what I like to call the base look. Although that changes, too. The Smith Cottage sign was created by my FAVORITE etsy shop owners, Rare and Beautiful Treasures. You can find them here! They have actually created several signs for my home and I am sure you'll see all of them later. The candles are battery powered flickering candles from Target (the other love of my life) and the boxwood wreath is from Target as well! The hare vase was actually a clearanced anthropologie find and since my thumb is anything BUT green, the lavender in it is fake and came from Hobby Lobby. 


Next stop, my favorite place in the den...the couch. This couch is actually one of the only pieces of furniture the hubs and I have ever purchased (new, at least!). You may notice that the wall behind the couch is a different color than the fireplace wall. I made the snap decision one day that I wanted one white wall in the sea of gray paint that is my house. So the hubs and I headed to Home Depot (our home away from home) and bought a gallon of white paint. Little did I know what a challenge it would be to cover up that dark gray. We used almost the entire can of paint on the one wall. Talk about a lot of coats! Nevertheless, I was thrilled with the result and I have no regrets! The fireplace itself looks COMPLETELY different than it did when we moved in...but that's for another post! As you can probably already tell, I have a slight obsession with wreaths (there are 3 in this room alone to be exact!) and windows. The giant 30 pane window here was a thrift store find. $30 for the whole thing! What a steal! The hubs thought I had lost my mind (not too far off) when we brought it home, but once we got the beast up on the wall, he was as enthralled as I was. A lot of our projects actually start that way. He thinks I'm crazy but goes along with it anyways. That's true love right there. 


Speaking of the hubs, shout-out to him for building me my beloved blanket ladder! He actually built the thing on our tiny apartment balcony before we moved into our house. We stained it together (my first experience with staining and I LOVED it!) We used a Minwax water-based stain in the darkest brown they had. I could not possibly recommend it more. The water-based has no odor and dries almost instantly, I kid you not. Plus of course, it's gorgeous! I mean look at it!


Next stop is the love seat. It is well loved I must say. My parents actually gave it to us when we moved into our house. It had been sitting in their basement for awhile and wasn't getting any use. It is a red floral pattern underneath, but since I am a weirdo and like to do things on the cheap, I ended up (with the help of my fabulous mother-in-law) covering it with a canvas drop cloth, sticking my Primitives by Kathy (another FAVE of mine) "Our Nest" pillow on there and calling it done. I love the way it looks and all it cost (to me anyways) was the price of the drop cloth!


I am all about neutral, so when I found this lamp from target I just had to have it for the den. However, when I saw the price from target I just had to find a cheaper option! Luckily, we have an awesome store called Bargain Hunt around here that carries overstocked or slightly damaged goods from some of the major home chain stores (like Target) and I found the exact lamp I wanted with a slightly dented shade and a black mark on the base. While standing in the store I was able to remove the dent with my fist as well as wipe off the mysterious mark with the inside of my shirt. I honestly felt like a superhero as I walked up to the register with my once $40 lamp turned $15 lamp in my hand. I essentially bought it undamaged for a fraction of the price and that was an accomplishment (for me anyways...I celebrate the little victories! LOL!) The end table was a hand-me-down from my husband's family that was made new with some linen paint and a little sandpaper. I told you...we really don't buy furniture new!

I hope you enjoyed my little den and I hope you'll stick around for more stops on the home tour coming soon!