Showing posts with label Tutorial. Show all posts

Thursday, August 4, 2016

More Shiplappin'

Hello! Remember when I said summer would be the perfect time for me to blog more? LOL! School starts back in a week and this is my second post for the whole break. So much for that! Needless to say, it has been a busy season and luckily the hubs and I were able to squeeze in one more (cheap) DIY project before it gets even busier! It's no secret that I love shiplap. If I could shiplap my whole house, I would do it in a heartbeat. However, it took us 4 days and a lot of headache to get just one wall done, so that will certainly not be happening. 

SO, most of you know that I had "shiplapped" my mantle awhile ago and settled on painting the rest of the wall white in lieu of continuing with it. 


Well long story short, I decided that wasn't enough. I approached my hubs with the idea this past weekend. I proposed we use the exact same materials as we did for the mantle (a cheaper shiplap alternative) but simply, multiplied. If you didn't catch it in my original shiplapping tutorial, here is what we used instead of actual shiplap or the other popular alternative, tongue and groove boards:
  • Six 8x4' Sheets of 1/4 inch Plywood Underlayment (We had to have ours cut down into Twelve 8x2' sheets in order to fit them in the back of my car and transport them home!)
They look like this:


(Peep my donut float making a cameo in the bottom right corner.) 

We got ours at Home Depot for about $12 a piece.
  • White Paint
We put a couple coats of Behr Premium Plus Ultra (Say that 5 times fast) Ultra white paint (with nothing mixed in) on the boards. It took about a gallon and a half to finish this project. Please ignore the awkward arm positioning...I have no idea what I was doing at the time.

  • Table Saw
Next, the most noisy and time consuming part of this process, cutting the boards. We cut ours into 6 inch wide strips. We left them all at 8 feet long so that we could use some and cut some down later when we knew more exact measurements. Ignore how hideously ugly our garage is...it was raining so we had to move everything indoors.


After we cut the strips, I applied a third and final coat of paint to them (the table saw was a little harsh on some) and we were FINALLY ready to start putting these bad boys on the wall.

This...as you can imagine...was a SLOW process. First, we actually had to remove the existing shiplap so that they would not make the rest of the wall look wonky. Wonky is a term my sister and her friends use all the time and now she has me saying it. I do feel as though it is a great description for this particular instance however. Anywho, we actually had a little laugh after removing the boards because both of us had forgotten that we put them up before re-painting the rest of the wall.

  • Hammer, Finishing Nails, A whole lot of patience
Next, the actual assembly. Yay! We had every intention of making a time-lapse video of the whole process but then promptly forgot. Oh well. We used tiny finishing nails to attach the boards to the wall and nickels (sorry cashier at target for requesting $2 in nickels as part of my cash back...it was all for the cause!) to space them out. Who needs actual spacers when you have loose change that you can spend again later...am I right? I apologize in advance for the HORRIBLE lighting. All of this work was basically done at night.


Slowly but surely, board by board, it all came together. One rookie mistake we made that I will warn you about now...we used galvanized finishing nails. Never use galvanized nails when you're working with and handling white wood. By the time we were finished, there were almost more black fingerprints and smudges than there was white paint. Luckily, magic eraser came to the rescue and cleaned it all up for me. I had originally planned to go back with a paintbrush and cover up the little nails, however the more I looked at them showing in all their glory, the more I loved them. I feel like it looks more authentic with them showing and I am all about that! 

Here are some before and afters of the finished product:


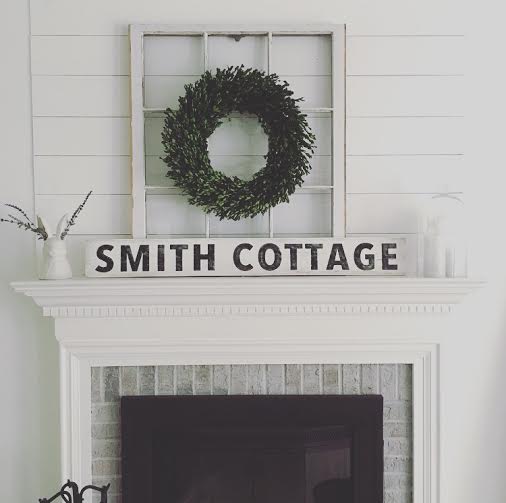
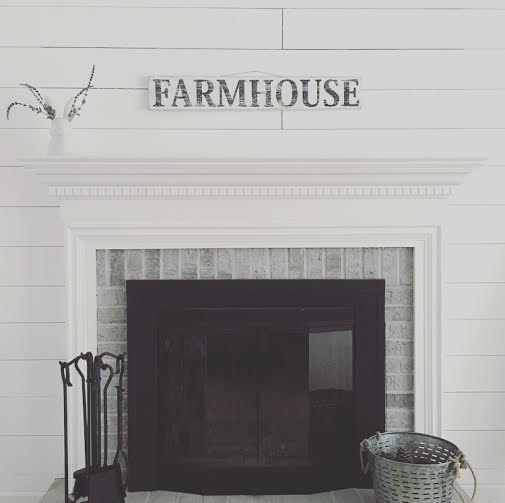
It was a lot of work, but oh so worth it! I apologize again for my utter lack of blogging this summer but I promise before you know it, I'll be back at it with all of my favorite fall decor! Thanks for reading and happy friday eve!


Tuesday, April 19, 2016

$15 Fireplace Makeover


One of the first things I wanted to change when we moved into our home was the fireplace. I have always thought of the fireplace as the focal point of any room and ours was in desperate need of an update. The red brick and brass just had to go but after just purchasing a house and getting thrown into the world of mortgage payments (yuck!) we had to find a way to change the look on the cheap. The first step was to gather the supplies. We made a quick run to Home Depot and bought a can of Rustoleum HIGH HEAT spray paint in a flat black color. You MUST make sure that it's high heat because well...it's a fireplace! The next thing we picked was a paint color for the brick. I chose a light gray (because I am a gray freak!) and a $3 sample size was plenty enough to cover the entire surface. We also grabbed painter's tape, a small plastic paint bucket with measurements, and a plastic drop cloth. Note: we also needed a screwdriver to remove the screen, a paint brush for applying the paint to the bricks, as well as an old rag for the white-washing (which I'll explain in a little bit). 

So here's a list just to make it a little less cluttered:

  • 1 can Rustoleum High Heat Spray Paint (We used flat black)
  • A sample sized container of paint (We used  a light gray color called Behr Porpoise)
  • Painter's tape (just to keep the paint from getting on the mantle)
  • A plastic paint bucket with measurements
  • A plastic drop cloth (just protective for the floor around the base of the fireplace)
  • Paint brush (any size you like but do NOT use a roller...too messy)
  • Screwdriver (to remove the fireplace screen if yours is like ours and is attached)
  • An old rag that you do not mind ruining!
The first thing we did once we had gathered all the supplies was tackle the fireplace screen. Bye bye brass! We unscrewed the entire thing from the top and removed it completely. We brought it outside and covered up the glass parts with newspaper scraps and painter's tape so they would not get painted black. Then went to town with the high heat spray paint! Once it was fully covered (it took a couple of coats) we left it outside to dry and came in to start on the bricks. For the bricks, we used a technique called white washing, although instead of using white paint, we used gray. Gray washing? Basically to white wash (or gray wash) something, all you do is make a mixture of equal parts paint and water. This is where that paint bucket with the measurements comes in handy! We added the paint and water, mixed it together really well (it will be very thin) and set it aside. Now it was time to prep the work space. In order to protect our carpet and our very white mantle, we lined the whole perimeter with the painter's tape and spread the plastic drop cloth around the bottom of the fireplace. We even used more of the tape to secure the drop cloth so there was no risk of gray paint splatter on white carpet! Once the area was ready to go, we brought in the paint, the paint brush, and the old rag and we got to work. White washing (in my opinion at least) is a lot like staining. You brush the paint/water mixture on the surface, and then wipe the excess off with the old rag. I told you...the rag is toast. The whole process did not take long at all and was surprisingly easy. The mixture actually covered our red brick really well. Once we had finished our gray washing, we stepped back and allowed the whole thing to dry completely. It took about an hour or so. By that time, the fireplace screen was ready to come back inside. We removed the newspaper and tape (and were quite relieved to see that the glass stayed unpainted). Then we carried the whole thing back inside, re-attached it to the fireplace and BAM! We had a whole new look...for almost no money. Now that's my kind of makeover! 

(Per usual I apologize for the quality of these photos...they were taken with my old phone!)


Just to make it a little easier to see, here is a step by step for the white washing process:

White Washing:
  • Make a mixture of equal parts paint and water (any color paint you want and you should not need more than a sample size to cover this size space)
  • Paint the mixture (it will be thin) onto the bricks
  • Come behind it and wipe the excess paint mixture off with an old rag until you get the look/coverage you desire
P.S. You may notice that at the time these photos were taken, we had not added our DIY Shiplap over the mantle. That is another tutorial coming very soon!

Here is the fireplace before we moved in, and here it is now! 


Thanks for reading! Stick around for more tutorials, home tours, and other fun stuff!