Monday, April 3, 2017

Catching Up: Halloween, Thanksgiving, Christmas, & Valentine's Day

Wow. I know I say this every single time I post but, long time no see! I wish I had a legitimate excuse for being SO incredibly bad at keeping up with my blog but..I really don't. Somehow I let all of my favorite holidays pass right on by without even thinking to do one measly decor post. For shame! Well, at this point I am actually on spring yes spring break and I figured what better to do with this extra time I've got on my hands than finally do some holiday decor blogging?! Better late than never...right? Honestly, in this case the never might have been the better option. Oh well. Here we go anyways. 

Something I have really tried to do this past year is simplify my decor. Not just holiday, but everything. I'm not sure what prompted it but I have never loved the way our home looks and feels more. I have tried to keep my favorite holiday pieces and not feel the need to buy a ton more each time a new season rolls around. It's funny, as I gathered the pictures from this past holiday season for this post, I realized how much I actually already want to rearrange for decorating next year.

ANYWHO, how about I hush and let's jump into Halloween...shall we?


Okay this has absolutely nothing to do with our home but I took it at the fair at the beginning of October and I just really loved it so I threw it in there. *Ahem* back to Halloween. So, I really don't have a whole lot of Halloween decor and that is fine by me. I've never really done spooky. Growing up, my Mom never did either. My siblings and I never dressed up in scary costumes, we never had a lot of horror movie-esque decor, and we always just left the focus on getting candy and having fun. I like to use jack-o-lanterns and bats to emphasize the time of year without getting too much into the creepy side of Halloween decorating.


I actually picked up a set of these ADORABLE ceramic pumpkin bakers from World Market in ORANGE at the end of the season last year (on clearance, woo!) so I already plan to use those on the mantle for Halloween instead of my green and white this year. I know, it's April. Calm down, Ashley, calm down.


Both the Boo Marquee and the adorable bats (in both of these pictures) are from the love of my entire life, Target. The marquee was something I actually bought on clearance in 2015 and the bats were from...get this...drum roll please...THE ONE SPOT. The one spot is my best friend. Forever and ever. Amen.


Last but not least, y'all know my little hutch has to be updated for every single holiday. My jack-o-lantern plates were originally from Pottery Barn. I got them on eBay for a steal. The candy corn candle is easily my favorite thing ever and it came from a store in our tiny mall back in Athens called Earth Bound (yes, literally bought the candle in college because I have always loved holidays and I am that weird). The only thing that I forgot to take a picture of that I am so sad about was my jack-o-lantern string lights that I LOVE and have also had since college. My mom has ALWAYS strung jack-o-lantern string lights from her mantle at Halloween and my freshman year of college, she bought me a set to hang up in my dorm. Have I mentioned my love for holidays and holiday decorating comes from my Mom? I have? A million times? Well, it's true. Plus of course I couldn't not throw my Rae Dunn mugs in there because...Rae Dunn.


Oh! Almost forgot our little fall porch. Sadly, my smaller pumpkin did not survive the season. I literally have no idea what happened to him but he got broken somehow so I'll have to replace him next year! Why am I referring to a plastic pumpkin as a him? Hm. Whatever.

Alright! Moving right along to Thanksgiving. Once again, I don't have a whole lot of Thanksgiving decor but the one thing I do focus on in November is COPPER. I love copper. This year I actually scored some copper pumpkin plates (be still my heart) from Michaels of all places! I totally put them in my hutch for the season because they totally matched my copper Give Thanks banner from Target last year. It was pure copper perfection.


See? Bless. Also in my hutch I have my precious pilgrim salt & pepper shaker family from Publix and my adorable new (well, they were new back in November anyways...) pumpkin soup bowl and butter dish from the Better Homes and Gardens collection at Walmart.

For my Thanksgiving mantle. I just threw some cute little distressed turkeys I got from Marshalls last year in with my world market pumpkins and called it done. Lastly. I strung up my favorite white pumpkin garland (also from Marshalls last year) over the bay window in our breakfast nook. Plus once again, Rae Dunn.


Okay! Finally, onto the most wonderful time of the year: Christmas! I feel like this was the holiday that I really simplified this year. I tried to focus on all natural greens and white winter tones. I feel like Christmas decorating can get really busy really fast and I really wanted to avoid putting something in every nook and cranny. I actually really loved the way it turned out and I hope you do too!

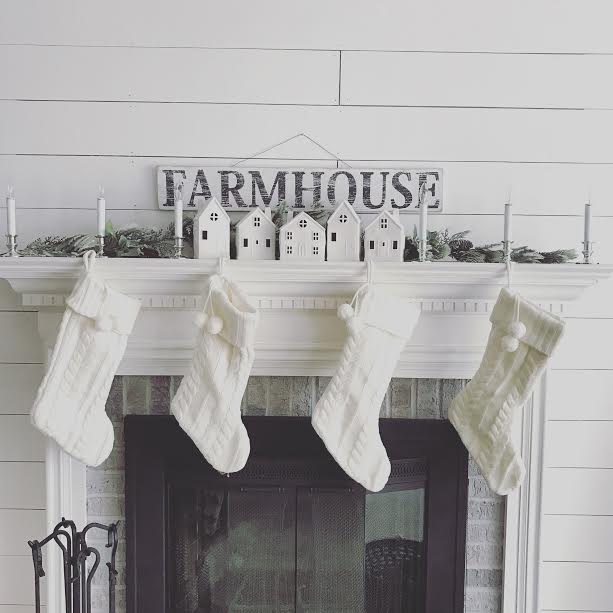
Per usual, I'll start with the mantle. This year, I used the snowy garlands I got from Michaels last year (for less than $10 a piece, score!) and opted to add some electric candles with silver bases from Hobby Lobby rather than the traditional string lights. I really liked the soft light they gave and was happy with my little change here! I also scored these AMAZING white ceramic village houses from...once again...drumroll please...THE TARGET ONE SPOT. Holla! Picked these babies up on black friday and have never been more happy with an impulse buy. Lastly, I hung up my white cable knit stockings from Target a few years ago and called it done. Yes I added 2 stockings...no we don't have 4 people living here...but I just really like the way 4 looked better. #designprobs

Next, enter my cheap, simple green wreaths from Hobby Lobby. I picked up 5 of these (for $6 a piece!) at Hobby Lobby while the Christmas decor was still 50% off. Double score! I ended up putting them EVERYWHERE around the house this season and I could not have loved them more. $30 very well spent, I'd say!


The only wreath that I did keep lit up was my giant walmart wreath on my giant window. I mean seriously, between the size of this wreath and the size of the bulbs on those string lights, this thing alone keeps our den well lit all season long.


Obviously, it wouldn't be a holiday without me switching out my Rae Dunn mugs and it wouldn't be Christmas without my (not famous but I wish they were) Christmas cookies. I make at least a dozen batches every season and give them out to friends and family. It really is the most wonderful time of year!


Okay, last but most certainly definitely completely totally not least. This year, M and I got a new tree. A new FLOCKED tree. Now I know there are a million flocked tree options out there and most of them are PRICEY. I feel like the brand I see floating around most on instagram is the King of Christmas flocked trees. They are absolutely gorgeous but for this preschool teacher, the price tag is WAY too high. This gorgeous tree (which I really regret not taking a full length picture of) is 7.5 feet tall, pre-lit, doesn't shed, and is from WALMART. Yep, you heard me right. Walmart. We bought it black friday weekend and it is my favorite thing ever! I highly recommend for next year if anyone is in the market for a flocked tree that won't break the bank.


Something I couldn't possibly leave out of this Christmas post is my gift from my brother's PRECIOUS girlfriend. She and her roommate teamed up to make me this AMAZING portrait of our house with adorable hand lettering that reads "Love dwells here". I am OBSESSED and it is still displayed right this second because it's perfection.


Oh and also, one more thing. One of my besties got me a GROUNDHOG ORNAMENT for my tree this year. It is the most extra and it is the best thing that's ever happened to anyone's Christmas tree ever. The end.


I was totally not even going to include this but VALENTINE'S DAY. I literally have like 1 thing that I used this year to decorate for this day of love and that was this adorable XO Marquee from Michaels. They had them clearanced right around February and I was like YES, PLEASE. Oh and of course Rae Dunn mugs because...obviously.


Alright guys, thanks so much for sticking around and feel free to judge me for doing a fall/winter holidays post in April...I am judging myself.

Happy End of Monday!


Thursday, September 29, 2016

Fall Home Tour 2016

HAPPY FALL Y'ALL! Welcome to my favorite season EVER! Pumpkins, corn mazes, fairs, caramel apples, flannel, cider, chunky sweaters, boots, hayrides, chilly nights, bonfires, and crunchy leaves. What more could you possibly want out of life? My obsession with all things fall is very real. This year I cannot even count the number of people who have sent me or tagged me in those "when you see one leaf hit the ground" or "pumpkin dancing" videos. I am not ashamed. I am a basic PSL drinking, boots and leggings wearing (when I'm not at work of course!), fall loving gal and I wouldn't want it any other way. All that being said, it should come as no surprise that I love to decorate my home for this gorgeous season. This year, I have been all about the neutrals. Over the past several months, I have made it my mission to make my home decor as simple and neutral as possible while still maintaining the cottage look that I'm after. This has of course, extended into my fall decorating. Now that it is officially fall and the temperature today is in the 60's, AND i'm on fall break, I felt it only appropriate to do this blog post. Strangely enough, the sole reason the hubs and I even came and looked at this house when we were browsing real estate websites was because of one picture of the front porch. One picture with one pumpkin on the stoop. It caught my eye and I said, "Mack! That one, I like that one!" He was like, "Which one? The one with the pumpkin?" and I was like "Yeah! Let's put that one on our list!" He looked at me like I was insane (and I am) for wanting to go look at a house just because there was a picture of a pumpkin on the porch, but low and behold, we put it on our list and we went to check it out the next day. Fast forward a few years and here we are! Decorating that very porch for my favorite season and having no regrets about giving into my strange pumpkin-induced whim. That is a really random story that you probably totally didn't care to know, but I felt like telling it anyways! Here is that magical picture that nobody besides me would probably ever think was magical.


and here is our porch today. Note: we changed the door about a year into living here. I was craving some more light in our foyer! My S door hanger was a local find and the mums and cornstalks came from Home Depot. I also have my electric Jack-o-lanterns that will be making their porch debut as soon as October rolls around!


Moving right along! Most of my fall decor comes from World Market and Target (as does pretty much all the decor in my home that isn't thrifted). First stop, the mantle.


Ever since we did our shiplap wall, I just cannot bring myself to cover up much of it. My mantle decor has become much more simplistic this year and I do not hate it at all. These sweet little pumpkin bakers are from World Market and I adore them. The colors are perfect and hey, you can cook in them if you want...so pretty AND functional! Win win!

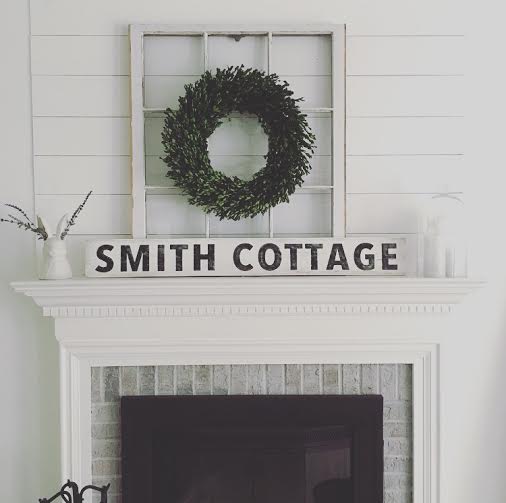
The den tour continues with the couch and the love seat. My beloved sweater pillows are currently up in the guest room so for now, the den is sticking with one of my other fall faves, plaid. These beauties are from Target's fall collection from last year and the boxwood wreath is from Target too (duh). I am sure I've mentioned it before but my amazing Smith Cottage sign is from my fave etsy shop ever, RBT Home Decor. They have made so many of the custom signs in my home and I am obsessed with everything they do! Check them out y'all. Seriously. 


The cantilever lamp by the couch is one of my favorite things ever. I just recently purchased it from Target for $35 to replace my old floor lamp and I have no regrets. That cute little gray pumpkin on the side table is also from Target (shocker, I know) and my favorite Primitives by Kathy "Our Nest" pillow is from Altar'd State. The toile ottoman is a yard sale find and the boxwood wreath on the thrifted window came from Joann a couple years ago. I know I have shown y'all my blanket ladder before but...I couldn't help it. Cable knit and fall just belong together.


This little piece of our home is so small and so random but I couldn't resist snapping a picture. We only have the tiniest bit of stair railing but you better believe I throw some lit garland on it at Christmas and some precious gold pumpkin candles from Home Goods on it for fall. This railing desperately needs a makeover...but that's for another day!

Onto the kitchen! Even my pie safe has not been safe (lol...get it? safe?!) from a pumpkin takeover this season. I have switched out all of my old dishes for neutral ones (pretty much all Rae Dunn from Home Goods and Pioneer Woman from Walmart) seriously y'all these are CHEAP dishes! I mean that in the best way, price wise not durability wise! The pumpkins with the gold leaf base are a Hobby Lobby find from last year. The pumpkin soup bowl and pumpkin butter dish are from Walmart's Better Homes and Gardens collection from this year! Seriously, if you haven't checked it out yet, do. I feel like ole walms gets a bad rep for home stuff but seriously, the BH&G collection never disappoints. The other white pumpkins in there are all from Target over the last few years. All of my Rae Dunn goodness has come from Home Goods/Marshalls/TJ Maxx as I have mentioned before, the Lunch sign is a World Market find from a few years ago, and the Market Fresh sign is another RBT Home Decor beauty.


MORE RAE DUNN! This mug was added to her collection this year and as soon as I saw it I knew I had to have it. I actually found this particular one at a TJ Maxx in Milledgeville over Labor Day Weekend when my friends and I stopped in looking for hot chocolate. Fate, am I right?!


and speaking of pumpkin spice...this.stuff. right. here. is. AMAZING. My director at work bought it for us a couple weeks ago and I have become totally addicted. So if you haven't tried it yet, you should. You will not regret it. I got mine at Walmart (seriously what is with walms having everything I need lately?) but I know it can be found at Publix as well! Plus, you can't just drink PSL at home out of a normal mug...it has to have it's own Pumpkin Spice mug, am I right?!


The last stop on this little tour is my little powder room. Seriously, this room is such a favorite of mine. In the theme of keeping it simple this year, I just decided to display yet ANOTHER RBT Home Decor sign of mine that ended up matching just PERFECTLY in the space. The lighting in this room is SO tricky, but if you can't tell, it reads: cider, flannel, and crunchy leaves. Talk. About. Perfect.


Well, that just about wraps it up. I think i'll go back to watching my fave Netflix show (Fireplace for the Home) okay it isn't my favorite and Mack hates it, but I LOVE the sound of the crackling fireplace even when it's not quite cold enough to actually have one, and drinking me a PSL. I have linked as many items as I could at the bottom to shop for and if the exact item is no longer available, I have linked a similar one! Happy Fall, Y'all. Thanks for reading!


Pumpkin Bakers: White   Green
Velvet Pumpkin: Here
Our Nest Pillow: Here
Boxwood Wreath: Here
Market Fresh Sign: Here
BH&G Pumpkins: Soup Bowl   Butter Dish
White Pumpkins: Large   Small
Gold Leaf Pumpkin (A DIY Tutorial): Here
Gold Pumpkin Candles (Similar): Here
Cantilever Lamp: Here
Plaid Pillows (Similar): Here
Gold Flatware: Here

Friday, August 19, 2016

Not so Extreme Laundry Closet Makeover

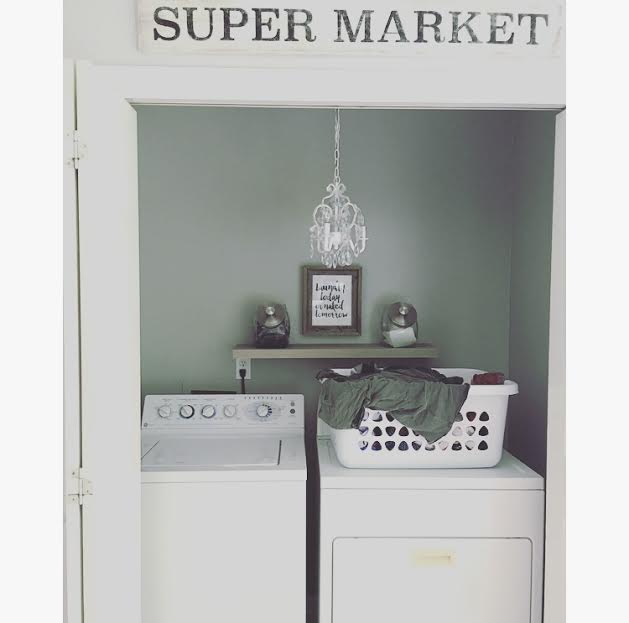
Hi friends! Just wanted to pop in and tell y'all about a little (very little) project the hubs and I completed over the course of this week. I may or may not have complained on here before about how ugly my laundry closet is. Yes, I did say laundry closet and not laundry room. This is because A) My sister-in-law corrects me every time I mistakenly call it a room and B) Well because it is by all standards...a closet. All there's room for is the washer and dryer and that is pretty much it. Who needs extra storage am I right? (Said no one ever). *Ahem* anyways, closet or not...that thing was U-G-L-Y. It was a tiny space that was overlooked and forgotten about when we were making our way through painting the house. I mean why bother, right? Who loves doing laundry? Not this girl. This closet is actually off of our breakfast nook in the kitchen and has bifold (not actually sure if that is the correct term or not) doors that conceal its ugliness. So, for the last 2 years I have just kept those doors closed and ignored it by all means necessary (not hard to do because...laundry). SO, as you can probably definitely guess based on the title of this already ridiculously long post...I finally decided that enough was enough! It was time to give that bad boy a makeover. First step, removing the old ugly yellowed utility shelf and patching all the lovely holes it left behind.


That whole process took about 20 minutes or so. (Enter husband with the power tools). Next, that lovely two tone nothingness had to go. Pro's of having a laundry closet? SUPER quick and easy to paint because it's a closet for goodness sake! So, I grabbed some left over oops paint from Home Depot that we had from another project and went to town. Side note: If you are unfamiliar with the term "oops paint" you should definitely become familiar with it. Oops paint (at least that is what they call it at Home Depot) is any gallon of paint that they mix for a customer that they do not end up liking and therefore put it on a discount shelf by the counter and mark it down to $9 for the whole gallon! You cannot beat that. We were lucky enough to find a lovely gray one day and have now used our $9 treasure for two projects. We still have lots left too! The next step was the light. The current light is one of a...dare I say it...fluorescent nature. Yuck, nothing I hate more! Luckily though, the gross thing is hidden up on the front wall where you cannot see it unless you are standing behind the washer and dryer. If you are the kind of weirdo who chooses to spend your time standing back there, then I have nothing to say. You will see my ugly fluorescent light. HOWEVER, thank goodness my awesome husband is an electrical engineer that can do things like wire a new outlet up there for me and hang a much more attractive/cottage friendly piece that his crazy wife found at a yard sale awhile back. Enter, my kiddie chandelier. Yes I know it was probably meant to hang in a little girl's adorable bedroom but I think it works PERFECTLY in this space. Of course since he is so awesome, he even wired it to where I can turn it off and on with the switch that once worked the ugly fluorescent thing. Last step: the shelf. I would love to sit here and tell you that I DIY'ed an awesome wood shelf but I didn't. My lazy self went to Lowes, picked out a $10 floating shelf, and called it done. The only other thing we did which is probably not noticeable to anyone but us was change out the old yellowed outlet and cover for new crisp, clean white ones. Since the thing just HAS to show above the dryer. 


All that to say, we now have a...drumroll, please...NOT SO UGLY LAUNDRY CLOSET! Yes I still hate laundry and no that will never change, but I now actually like to leave those doors open and show off my washer and dryer to the world. It is no longer my Monica closet (Friends fans where you at?!) and I am no longer ashamed. Of course my sign was re-hung because it is my one and only motivation to do laundry. I will leave you with it: Laundry Today or Naked Tomorrow.

Happy Friday you guys and cheers to the weekend!

Thursday, August 4, 2016

More Shiplappin'

Hello! Remember when I said summer would be the perfect time for me to blog more? LOL! School starts back in a week and this is my second post for the whole break. So much for that! Needless to say, it has been a busy season and luckily the hubs and I were able to squeeze in one more (cheap) DIY project before it gets even busier! It's no secret that I love shiplap. If I could shiplap my whole house, I would do it in a heartbeat. However, it took us 4 days and a lot of headache to get just one wall done, so that will certainly not be happening. 

SO, most of you know that I had "shiplapped" my mantle awhile ago and settled on painting the rest of the wall white in lieu of continuing with it. 


Well long story short, I decided that wasn't enough. I approached my hubs with the idea this past weekend. I proposed we use the exact same materials as we did for the mantle (a cheaper shiplap alternative) but simply, multiplied. If you didn't catch it in my original shiplapping tutorial, here is what we used instead of actual shiplap or the other popular alternative, tongue and groove boards:
  • Six 8x4' Sheets of 1/4 inch Plywood Underlayment (We had to have ours cut down into Twelve 8x2' sheets in order to fit them in the back of my car and transport them home!)
They look like this:


(Peep my donut float making a cameo in the bottom right corner.) 

We got ours at Home Depot for about $12 a piece.
  • White Paint
We put a couple coats of Behr Premium Plus Ultra (Say that 5 times fast) Ultra white paint (with nothing mixed in) on the boards. It took about a gallon and a half to finish this project. Please ignore the awkward arm positioning...I have no idea what I was doing at the time.

  • Table Saw
Next, the most noisy and time consuming part of this process, cutting the boards. We cut ours into 6 inch wide strips. We left them all at 8 feet long so that we could use some and cut some down later when we knew more exact measurements. Ignore how hideously ugly our garage is...it was raining so we had to move everything indoors.


After we cut the strips, I applied a third and final coat of paint to them (the table saw was a little harsh on some) and we were FINALLY ready to start putting these bad boys on the wall.

This...as you can imagine...was a SLOW process. First, we actually had to remove the existing shiplap so that they would not make the rest of the wall look wonky. Wonky is a term my sister and her friends use all the time and now she has me saying it. I do feel as though it is a great description for this particular instance however. Anywho, we actually had a little laugh after removing the boards because both of us had forgotten that we put them up before re-painting the rest of the wall.

  • Hammer, Finishing Nails, A whole lot of patience
Next, the actual assembly. Yay! We had every intention of making a time-lapse video of the whole process but then promptly forgot. Oh well. We used tiny finishing nails to attach the boards to the wall and nickels (sorry cashier at target for requesting $2 in nickels as part of my cash back...it was all for the cause!) to space them out. Who needs actual spacers when you have loose change that you can spend again later...am I right? I apologize in advance for the HORRIBLE lighting. All of this work was basically done at night.


Slowly but surely, board by board, it all came together. One rookie mistake we made that I will warn you about now...we used galvanized finishing nails. Never use galvanized nails when you're working with and handling white wood. By the time we were finished, there were almost more black fingerprints and smudges than there was white paint. Luckily, magic eraser came to the rescue and cleaned it all up for me. I had originally planned to go back with a paintbrush and cover up the little nails, however the more I looked at them showing in all their glory, the more I loved them. I feel like it looks more authentic with them showing and I am all about that! 

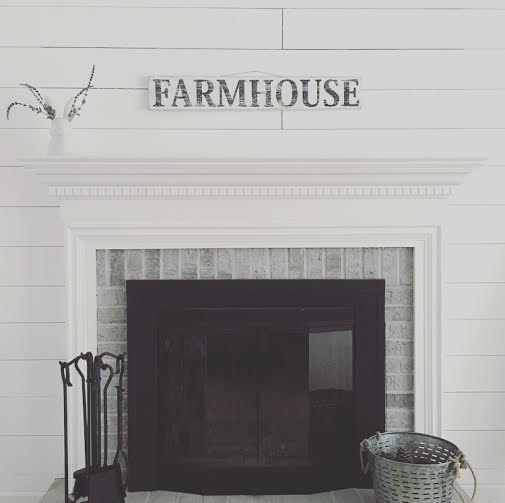
Here are some before and afters of the finished product:


It was a lot of work, but oh so worth it! I apologize again for my utter lack of blogging this summer but I promise before you know it, I'll be back at it with all of my favorite fall decor! Thanks for reading and happy friday eve!